


The vast majority of articles in this series deal with people whose main claim to fame is their chess ability, but Sir George Thomas provides an exception, although his chess achievements were not in any way second-rate. He won the British Championship twice, in 1923 and 1934, played in seven Olympiads from 1927 to 1939 (scoring +9 =6 in the first of these at London 1927), and in a long career scored individual wins against players such as Tarrasch, Capablanca, Euwe and Botvinnik.
Born in Istanbul on 14th June 1881, he inherited the title of Baronet, a British title dating back to the Middle Ages. He became the most successful player ever in the All-England Open Badminton Championships, gaining 21 titles including four consecutive victories in the men’s singles from 1920 to 1923. His tennis was also of high standard, and he competed several times at Wimbledon. It’s remarkable that someone should achieve so much success in two such diverse sports as chess and badminton (if one grants chess that status), but he did have the advantage of not needing a job.
Sir George Thomas had a universal style, without showing much of a preference for any particular type of position. His best tournament result was at Hastings 1934/5, where he shared first place with Euwe and Flohr, ahead of Capablanca and Botvinnik. He played mainly 1.e4, with a fondness for the Closed Sicilian, but he occasionally ventured the Queen’s Pawn, as in the game below. With Black he preferred to meet 1.d4 with the Classical Queen’s Gambit, but against 1.e4 he was more flexible and played a wide range of king’s pawn openings. Despite his successes in individual games, he rarely achieved a high position in top-level tournaments, and this seems to be partly because he achieved poor results against certain players. Many strong players have a nemesis, against whom they seem unable to play up to their usual standard; for example, for Tal it was Korchnoi. Sir George Thomas seemed to have several nemeses, including Max Euwe, against whom he managed only half a point from seven games with White.
In what seems a common refrain in these articles, Sir George Thomas is not well remembered today. There is no book of his games, and despite his numerous wins against leading players there is no single really memorable game one can point to. As an example of his pragmatic style, here is a win against one of the most successful tournament players of his day.
Sir George Thomas - Frank Marshall
Liège 1930 Queen’s Indian Defence
1.d4 Nf6 2.c4 e6 3.Nf3 b6 4.e3
These days 4.g3 and 4.a3 are the most popular lines, but this quiet developing move still has its adherents.
4...Bb7 5.Bd3 Nc6?!
This looks dubious, blocking the diagonal for the b7-bishop without really exerting any pressure against the d4-pawn, which is securely defended by the e-pawn. It also makes it hard for Black to challenge White in the centre, since ...c5 is now impossible and ...d5 is likely to lead to an inferior type of Queen’s Gambit in which the c6-knight is badly placed. Instead, 4...d5, 4...c5 and 4...Be7 are better choices.
6.Nc3
While it’s not really wrong, I don’t see why White should play this so early. There’s no advantage to doing so and it allows Black to at least solve the problem of developing his King’s bishop. Instead, 6.0-0 looks more flexible, while there’s also a case for 6.a3.
6...Bb4 7.Bd2
White prefers not to allow doubled pawns, but 7.0-0 was equally good.
7...0-0 8.0-0 d5
Marshall decides to act in the centre despite the problems posed by the poorly placed knight on c6. Perhaps 8...Ne7 was better, attempting to fight for some control of e4.
9.Rc1 Qe7
Marshall tended to prefer simple developing moves to any elaborate strategy, so he moves the queen in order to develop the a8-rook. One defect of this move is that when White plays a3, Black will be forced to concede the two bishops, since after ...Bd6 White can play Nb5.

10.cxd5 exd5
Now we can see that the knight on c6 creates some difficulties for Black because the c7-pawn is in danger of becoming a backward pawn on a half-open file. Normally Black would have his knight on d7 and solve the problem of the c-pawn by either ...c6 or ...c5. There’s no active square to which the c6-knight can move, so there’s no natural solution to this problem.
11.Qc2 Rad8 12.a3 Bxc3
As mentioned earlier, 12...Bd6 can be met by the obvious 13.Nb5, but in this position it’s even better to play 13.Rfe1, as Black then must waste time dealing with the strong threat of 14.e4.
13.Bxc3 Ne4
Black at least manages to get one knight to a decent square, but without the support of his other pieces this doesn’t amount to much.
14.b4
Threatening b5, followed by Bb4.
14...a6?!
This was Black’s last chance to do something about the mounting pressure along the c-file. He should have played 14...Nb8 15.Bb2 c6 followed by ...Nd7, putting the knight where it really belongs, albeit with a considerable loss of time. It’s psychologically difficult to play a move like ...Nb8, firstly because it looks ugly to retreat a knight to the first rank, and secondly because it’s a clear admission that it was a mistake to put the knight on c6 in the first place.
Note that although 14...Nxc3 15.Qxc3 a6 prevents White keeping the two bishops, it comes at the cost of exchanging Black’s best minor piece for White’s not especially active dark-squared bishop. It also makes it harder to do anything about the build-up on the c-file.
15.Bb2
White decides to keep the bishop pair. Although he has a clear advantage, it’s not easy to suggest a way to increase it. One possibility is to swap the active e4-knight by Nd2, but it’s even better to improve his position quietly with Rfe1, since Black lacks active play.
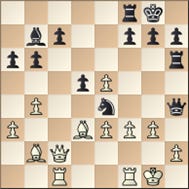
15...Rd6

When positionally worse, Marshall had a habit of lashing out, and this game is no exception. He intends to play for a kingside attack with ...Rh6, perhaps followed by ...g5-g4. This strategy often led to success even against some first-rate players, since his tactical ability was world-class, but Sir George Thomas is up to the task of countering the kingside threats.
16.Ne5!
It looks a bit risky to remove the only minor piece defending the kingside, but White has calculated accurately. The threat of f3 forces Black to take immediate action.
16...Rh6?!
Consistent, but too ambitious, since attacking from a situation of positional inferiority is unlikely to succeed. The most obvious move is 16...f6, but then the sharp 17.f3 Ng5 18.f4! Ne4 (18...fxe5 19.dxe5 also gives White a large advantage) 19.Bxe4 dxe4 20.Qc4+ Kh8 21.d5 Nd8 22.Qxc7 Qxc7 23.Rxc7 Rxd5 24.Nc4 is very good for White.
The modest 16...Nxe5 17.dxe5 Rc6 18.Qe2 Rxc1 19.Rxc1 c5 is probably best, although with the position opening up the two bishops are likely to be an important factor.
17.f3 Nxe5
The immediate 17...Qh4 loses to 18.Ng4 Rg6 19.fxe4 Rxg4 20.exd5 Ne7 21.e4, so Black first swaps knights.
18.dxe5 Qh4 19.g3!
White coolly puts Black’s queen and knight under attack and doesn’t fear the sacrifice on g3.
19...Qg5
An admission of failure, but 19...Nxg3 20.hxg3 Qh1+ 21.Kf2 Rh2+ 22.Ke1 is safe for White and leads to a winning position after 22...Rxc2 23.Rxh1 Rxb2 24.Bxh7+ Kh8 25.Rxc7.
20.fxe4 Qxe3+ 21.Qf2
Avoiding any further complications, White heads for a clear win. Simply keeping the extra piece by 21.Rf2 dxe4 22.Bc4 is also effective.
21...Qxd3 22.Rxc7
White has overwhelming threats against b7 and f7.
22...Bc6 23.Qxf7+ 1-0
A neat finish, forcing mate in three more moves.