


David Howell (1990 -)
David Howell was born on 14th November 1990 in Eastbourne, Sussex, and was a true chess prodigy. After learning the game at the age of five he advanced rapidly, and won the British Championship in the U8, U9 and U10 categories. However, David really came to wider attention in 1999 when, at the age of eight, he beat me in a blitz game at the Mind Sports Olympiad. It wasn’t that I blundered; he played very well positionally as a foretaste of the strategic style he would master as an adult player. A year later he qualified to play in the British Championship, and at the time was the youngest player in the world to qualify for a national championship. In 2001 he finished joint first in the European U12 Championship and joint second in the World U12 Championship. A year later he gained further widespread publicity by drawing a game against Vladimir Kramnik, who was world champion at the time.
David’s chess career continued on an upward trajectory in the 2000s; he gained the International master title in 2004 and the grandmaster title in 2007 at the age of 16, taking over from Luke McShane as the youngest British player to achieve this title (a record which has now been broken). David followed a busy schedule over the next few years, with many tournament successes in both individual and team events. In 2008 he was third in the World Junior Championship and won the British Rapidplay Championship with 10/11, while in the following year he won the British Championship with a score of 9/11. In 2010 he went one better in the British Rapidplay, winning with a phenomenal 10½/11, and in 2013 took his second British Championship title. The following year he tied for first in the British Championship (with Jonathan Hawkins) and in 2015 he won the first British Knock-out Championship, from which the game below is taken. The same year saw his rating reach his personal best of 2712. Still only 25, one might have expected his over the board career to continue upwards, but since 2015 it has gone more or less sideways. Despite consistently good performances in both individual and team events, for example gaining a gold medal on board 3 at the 2022 Olympiad, he has not made further progress. This may be because he has developed extra careers as a chess columnist and commentator, writing for The Times and providing entertaining commentary on various platforms.
His style is highly positional, and so he favours solid openings; for example, as Black he has adopted the Berlin Defence in the Ruy Lopez and the Caro-Kann. He is also very patient, and in Mega Database he has an extraordinary number of very long games, including an amazing 39 with 100 or more moves (not all, it must be said, totally serious). The following is a typical battle against a player with a far more tactical style.
David Howell - Gawain Jones
British Knock-Out Championship, London 2015
King’s Indian Defence
1.d4 Nf6 2.Nf3 g6 3.c4 Bg7 4.Nc3 0-0 5.e4 d6 6.Be2 e5 7.d5
The Petrosian System is one of the main lines against the King’s Indian, and well suits David’s solid positional style.
7...Na6 7...a5 is the most popular move here, aiming for ...Na6 and possibly ...Nc5, but the move played is also reasonable.
8.Bg5 h6 9.Bh4 g5 10.Bg3 Nxe4 This temporary piece sacrifice has been seen quite often, but there are other interesting ideas for Black; for example, the pawn sacrifice 10...Nh5 11.h4 g4 12.Nd2 f5!? is worth a look, since 13.exf5 Bxf5 14.Bxg4 Nxg3 15.fxg3 Bd3 gives Black fair compensation.
11.Nxe4 f5 12.Nc3 12.Nfd2 fxe4 13.Nxe4 b6 followed by ...Nc5 allows Black to challenge White’s control of the critical e4-square, and is close to equality.

12...f4 This is the only move to have been played, but Black has an interesting alternative in 12...e4!? 13.Nd2 (13.Nd4 Qf6 14.Ncb5 f4 is fine for Black) 13...Bxc3 14.bxc3 f4 15.Nxe4 Qe7 16.Bd3 Bf5 17.0-0 Bxe4 18.Re1 fxg3 19.hxg3 Qf7 20.Bxe4 Qxf2+ 21.Kh2 Qf6 , followed by ...Nc5, and it is hard to see any advantage for White.
13.Nd2 Nc5 14.Nde4 fxg3 15.hxg3 The upshot of the tactical interlude is that White has surrendered the two bishops, but in return has a hold on the e4-square, always important in lines of the King’s Indian in which ...fxe4 or exf5 occur. If White can maintain this blockade without allowing counterplay elsewhere then the g7-bishop may be doomed to permanent passivity. Typically for David, he likes White’s long-term advantage determined by the pawn-structure.
15...Nxe4? This looks wrong, as White’s control of e4 is cemented without him having to make any further concessions. 15...Bf5 16.Bd3 Nxd3+ 17.Qxd3 g4 is better, as now Black has two bishops against two knights to compensate for White’s strategic assets. It’s noteworthy that the exchange on g3 helps White by opening the h-file, so that Black cannot activate his g7-bishop by ...h5 and ...Bh6.
16.Nxe4 Bf5 17.Bd3 Now White threatens g4, further reducing any possible activity by the g7-bishop.
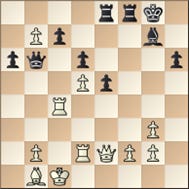
17...g4

Gawain hastens to prevent the advance of the g-pawn, but it’s still hard to see much of an active plan for him. The rest of the game features Black’s ingenious attempts to develop counterplay, only to ultimately fail.
18.Qd2?! 18.Rh4! looks more accurate, intending a plan such as Qe2, Rd1 and Kf1, with an eventual exchange of bishops by Nc3 and subsequent win of the weak g4-pawn.
18...Qe8 19.0-0-0 b5! Certainly, the best chance. Black must act quickly, or else White will improve his position further.
20.cxb5 a6 This looks dangerous, since 21.bxa6 Bxe4 22.Bxe4 Qa4 23.Bb1 Rxa6 gives Black good compensation, while 21.a4 axb5 22.Bxb5 Bd7 23.Bxd7 Qxd7 24.b3 Rab8 25.Qc2 Rb4 also offers activity in return for the pawn.
21.b6! The correct response, avoiding further line-opening on the queenside.
21...Bxe4 Playing to win the a2-pawn. 21...Qa4 22.Nc3 Qd7 23.f3 cxb6 24.Kb1 is also very good for White.
22.Bxe4 Qa4 23.Qe2?! This makes life more complicated for White. 23.Rde1 Qxa2 24.Rxh6! cxb6 25.Rxd6 is simpler, since now the rook can interpose on c6. The move played is also good, but requires an accurate follow-up by White.
23...Qxa2 23...cxb6 24.Kb1 Rxf2 25.Qxf2 Qxe4+ 26.Qc2 is technically winning for White.
24.b7! The brave b-pawn sows confusion in Black’s position. This is the only move to give White an advantage, since with the black queen on a2 White cannot allow the c-file to be opened.
24...Rae8 The tactical justification for White’s play lies in the line 24...Rab8 25.Qxg4 Rxb7 (25...Qa1+ 26.Bb1 Rxf2 27.Qc8+ Bf8 28.Rd2 also wins) 26.Qe6+ Rf7 (26...Kh8 27.Rxh6+ mates) 27.Qc8+, winning the rook.

25.Rh4? A mistake, letting Black back in the game, although the reason is quite subtle. The correct 25.Qxg4! Rxf2 26.Rd2 gives White a large advantage in every line, although the tactics are tricky:
1) 26...Rxd2 27.b8Q! (27.Qe6+? Rxe6 28.b8Q+ Bf8 29.dxe6 Rf2 30.e7 Qc4+ draws by perpetual check) 27...Rxb8 28.Qe6+ Kh8 (28...Kf8 29.Rf1+ mates) 29.Rxh6+ Bxh6 30.Qxh6+ Kg8 31.Bh7+ Kf7 32.Bg6+ Kf6 33.Bh5+ Ke7 34.Qe6+, and White mates next move.
2) 26...Qa1+ 27.Bb1 Rxd2 28.Qe6+! (28.b8Q? Rxb8 29.Qe6+ Kh8 30.Rxh6+ Bxh6 31.Qxh6+ Kg8 only draws, since the white bishop is pinned) 28...Rxe6 29.b8Q+ Bf8 30.dxe6 defends b2 and wins.
It’s remarkable that in line 1 the continuation with b8Q wins, while that with Qe6+ draws, but if Black first checks on a1 (line 2) then the situation is reversed.
25...Qa1+? I often teach players that even if you have a bad position there’s almost always one chance to get back in the game. The task is to be alert to seizing the chance when it arrives. Here the departure of the white rook from the first rank gives Black his momentary possibility for counterplay by 25...Rb8!. This was bad before, but is now correct, since after 26.Qxg4 (26.Rxg4 Rxb7 27.Bb1 Qb3 is roughly equal) 26...Rxf2 27.Qc8+ (27.Rd2?! Rf1+ is the key point, exploiting the rook’s absence) 27...Bf8 28.Qe6+ Kh8 29.Rxh6+ Bxh6+ 30.Qxh6+ Kg8 31.Bh7+ Kf7 32.Qg6+ Ke7 it’s only perpetual check. Therefore White would have to play a line such as 26.Bb1 Qb3 27.Rd2 Rxb7 28.Qxg4 e4, which may maintain an edge, but certainly gives Black far more counter-chances than in the game.
26.Bb1 The situation is now improved for White, because if he can defend b2 the queen on a1 will be left out of play.
26...Qa5 26...Rb8 no longer works due to 27.Rxg4 Rxb7 28.Qc2 e4 29.Rd2!, with the deadly threat of 30.Rxg7+ Kxg7 31.Qxe4, while 29...Re8 can be met by 30.Qc6 Reb8 31.Qd7.
27.Rxg4 Qc5+ Black plays to capture the annoying b7-pawn, but his king is now too exposed to survive for long.
28.Rc4 28.Bc2 Rxf2 29.Qe4 also wins.
28...Qb6 29.Rd2!
Defending both b2 and f2.
29...Qxb7 30.Qe4 Now it’s White’s turn to attack.
30...Rf6 31.Qh7+ Kf8 32.Bf5 Heading for e6.
32...Re7 33.Be6 Ke8 The king flees, but White’s positional advantage is too great.
34.Rdc2 Exerting pressure on both sides of the board.
34...Qb6 35.Rc6 Qa7 36.Rxd6 White finishes with a small tactic.
36...Rxf2 37.Qg6+ Rff7 Black threatens 38...Qg1+ with a perpetual, but this is easily countered.
38.Kb1 Qg1+ 39.Ka2 Qf1 40.Rb6 1-0
White’s neat switch with the rook creates the unanswerable threat of Rb8#.